I read a lot on music, so I've come across my share of interviews with pros in the field of recording. When asked about the specifics of a particular mixing/mastering technique, I've noticed that many guys will respond something like this: "Man, if it sounds right, it is right." Then they talk about how one time they had to boost the snare by 16dB at 5.38kHz and it really made it pop. The album made platinum and the mixer was presented with the “Best Snare Sound Award” from the Canadian Council of Superior Recordings.
That’s a great story and all, but in my opinion “If it sounds right, it is right” is the worst piece of advice you could ever give someone learning about mixing/mastering. Why? Because most newbies to recording have neither the experience nor the training to be able to hear the way a mixing/mastering engineer has learned to hear. What sounds right to a newbie could sound right for all the wrong reasons. Amateur recordists should actually dedicate a fair amount of time trying to learn what it is exactly that the pros are hearing.
Once I was...eh-hmm…"mastering" a track and trying to give it some sparkly top end clarity like a radio cut. Over the course of the session, I thought I was making all the right moves. In my mind I was a mastering badass. The next morning I almost wet myself when I heard how absolutely horrible I made the track sound. Instead of making it sound radio-ready, I made it sound like a straight pin was used as a stylus on a record player.
My point? Newbies don't know what "right" sounds like. Heck, it took me a good year before I was able to hear how each of the parameters on a compressor changed the sound of the effect. Do you remember your first experiments with EQ? At that early point in our development as mixers, how were we supposed to know what a tasteful amount of EQ sounded like? I know I‘ve made my share of bad mix moves over time. But through these mistakes—and hopefully through critique as well—we slowly start to understand how a pro hears.
Anyhoo…now that I’ve been around the block a few years, I know what the pros really mean when they say "If it sounds right, it is right." So, let me translate for you, because I think it’s instructive. Here’s the translation:
“In my 25 years experience working in the recording industry on hundreds of major-label projects, where I've become extremely familiar with the best gear money can buy, I have learned through countless opportunities of trial and error that occasionally it's okay to violate a general recording guideline in order to achieve the sound I think will benefit the song as a whole. And even though I will sometimes push a principal beyond what is typically acceptable, I make sure that my decision will not jeopardize the sonic integrity and fidelity of neither the individual part nor its relation to the whole."
This is what they mean. Not as easy to toss off as a zen-like maxim, I know. But, until you're in their same situation, which won't be for a while, you may think twice when the violation of a generally-accepted recording axiom sounds "right."
My advice: if you're new to mixing/mastering or recording in general, just stick to the general guidelines you read about in trusted books and blogs. You might not create stellar mixes but they're also not going to suck really bad because you decided that boosting all the tracks 12dB at 2kHz sounded “awesome.”
So, what can you do right now to start hearing like a pro? Continue making and learning from your mistakes. Try out the suggestions given in books and magazines. Get advice and critique from someone who’s ahead of you. Train your ears with products like David Moulton’s Golden Ears, or take the quizzes at sites like Easy Ear Training or Dan Comerchero's QUIZTONES. Watch mixing/mastering tutorials with your headphones on. Take mixing lessons from a local mix engineer. Read Bobby Owsinski's isolated track analyses and listen for what he hears. Look for tutorial sites that include audio examples, like AudioTuts+. Study those examples until you can hear what they're hearing. It won’t happen overnight, but you’ll slowly improve your ear over time. Until then, appreciate the level you’re at right now and have fun.
Happy Mixing!
FOr daily tips on music production, recording, songwriting, and Pro Tools, follow Create Music Productions on Twitter @CreateMusicPro
Sunday, August 15, 2010
Thursday, August 12, 2010
Musical Filler as Production Tool
The vinyl noise on YG’s “Toot It and Boot It” sounds like it’s been added to the sample, or at least hyped to extreme loudness. But I don’t mind at all. In fact, it’s a great production trick!
“Toot It & Boot It” is a relatively simple track when compared to other songs in the same genre, and lack of complexity can sometimes work against you in a recording situation. Too much “silence” in music can be deadly, especially for music geared toward commercial success. So if there’s something missing in your sparse arrangement, there are a few tricks you can use to fill-in-the-blanks.
The most obvious are pads and percussion. Subtle sustained chords do wonders to add ambience to a track that needs it. Shaken percussion can also add “something” to a track that sounds like it “needs something,” and has been a tried-and-true producer technique for years. Their high frequency energy will also add a crispy balance to the usually crowded low-mid-range. Listen to the claps and metallic jangly thing at the intro of Linkin Park’s “I’ve Given Up.” Now imagine if the intro consisted of just the guitar, which is what most amateurs would have done. Boring. The claps and jangles add so much energy, which fills empty musical space and gives the listener an idea of where the track is heading.
Another trick is to add a simple but cool sound. The eerie sound that runs through “Boom Boom Pow” is a great example. The Black Eyed Peas use it as background filler as well as weave it in and out of the musical texture to keep the arrangement fresh. Notice how it fades out when Fergie first comes in, but then comes back at the first chorus. This keeps the track moving without adding too much variety (which can distract from the vocal and disrupt the groove).
People-noise can keep a track from sounding too sparse. Listen to the hooting crowd that runs throughout Kanye’s “Homecoming.” Linkin Park’s “Bleed it Out” also uses the sound of a crowd to keep the intro guitar part from sounding too “alone.” The crowd also serves to add angsty energy to the track as a whole. Nice.
There are less obvious ways to add much needed sonic filler. On the really subtle side tape emulators come to mind. Tape hiss has “warmed up” analogue recordings for years. White/pink noise can also work in rare circumstances, although it is far less musical. That kind of noise is usually used to dirty up a synth sound. (…But if your synth sound lacks texture, consider adding some noise!) Nine Inch Nails uses a wind sound (probably a synth-generated sound effect) throughout “Hurt,” and it helps evoke an emotional affect and fills the void.
Vinyl noise also falls under the above category. This iconic phonographic artifact can actually do a lot to not only fill the void, but “glue” the rest of the sounds together. According to Gestalt theories of perception, a “figure” needs a “ground” to be noticed. For something to be in the foreground, there must be a differentiating background to give it contrast. The hyped vinyl sound in “Toot It and Boot It” works well as filler to keep the simple arrangement from sounding too vacant, but it also acts as a foundational bed that unifies the piece as a whole. The scratchiness of the vinyl is the field on which the musical play happens, and allows the old sample and the new drum/vocal production to collaborate instead of clash. When the sample drops out toward the end (around the 3-minute mark), notice how something sounds missing? The drop out adds needed contrast at that point, but when the sample returns in all its vinyl-rrific glory, it just sounds better.
If all that sounds too academic, then I’ll simplify: pads, percussion, crowd sounds, synth effects, and vinyl noise are tools in a producer’s bag that she will sometimes use to rescue a sparse track from the void. This kind of subtle production “voodoo” is often what differentiates an amateur sounding recording from a professional one. Try it out.
If you have used a similar effect, please leave a comment explaining what you used and how you used it.
Happy Producing!
For daily tips on recording, music production, songwriting, and ProTools, follow Create Music Productions on Twitter @CreateMusicPro
Monday, August 9, 2010
Pro Tools TIP: The Balanced-Levels-But-Clipping-the-Master-Bus Problem and How to Solve It.
Important!: In October of 2010, @RandyCoppinger showed us a simple but brilliant way to adjust all volumes on every track (including automation) in one swoop: http://www.youtube.com/watch?v=Q0mujYBo72U It's nice to know the method I describe (below), but his way is easier and faster. Thanks Randy!
During a mixing session I've got my individual track levels all balanced with each other
 and it's sounding great. BUT...then I look down only to discover that I'm clipping my master bus. Bad news. The first thing that comes to my mind is "Oh crap, am I really gonna have to pull down each fader one by one by the same level until I get my master fader in the yellow?" You see, I don't want to lose the balance I just spent hours perfecting, but I also don't want to adjust 30 faders. What to do?
Never fear, I have a solution for you.
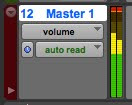
Select ALL

(Why so low? I"ll explain that in another post.)
Notice how all the faders in the session move together by the same amount because you ALL have
What you've done is quickly eliminate your clipping problem while retaining your overall level balance. Yea!
Now, this trick only works easily if you haven't added any volume automation. In fact, this is one of the reasons I sometimes will wait as long as I can to add any volume automation moves to my mix. But, if you already have volume automated somewhere, the world hasn't come to an end, you just have to do an extra step.
Here's what you do:
Triple click in the automation lane to select all automation points and, with the smart tool, move the cursor to the top of the track until it turns into that Tron-looking sideways cursor. Then, click-hold and pull down the same amount of dB's that you had to pull down on the master fader in the first trick.

This will lower all automation points in that track evenly. But notice how the Tron-cursor (not an Avid term by the way) moves in large increments? To fine tune your moves, hold down command* after you click.
> > > > > > > > >
The above trick also works if you've achieved a level-balanced mix where the master bus is peaking way too low. You can bring up the global level in the same way. (Although, take care that no individual track clips as a result.)
Eventually you'll learn how hot you can push your volume faders at the beginning of the mix so you won't clip the master bus later. But until that happens, I hope this trick helps save you a bunch of time.
Now, if you see a problem in my solution to the balanced-levels-but-clipping-the-master-bus issue, please let me know. Also, if you have a better or alternate way of solving this problem, please post it in a comment so we can all benefit from your knowledge.
Important Addendum:
@edgenificent pointed out that the above trick works, but may not be necessary. Citing an article called "Keep Your Headroom" by Mike Thornton from the June 2010 issue of Sound on Sound, he politely informed me that bringing down the master fader to keep the mix bus meter out of the red isn't that big of a deal. To quote the article, "The take-home message is that yes, it is okay to just bring down the master fader a bit if you get a clip on its level meter." The rest of the article is worth the read, and can be purchased for $1.50 from Sound on Sound: http://www.soundonsound.com/sos/jun10/articles/pt_0610.htm
Happy ProTooling!
Follow CMP on Twitter @CreateMusicPro
*keyboard shortcuts given apply to a Mac
Subscribe to:
Comments (Atom)